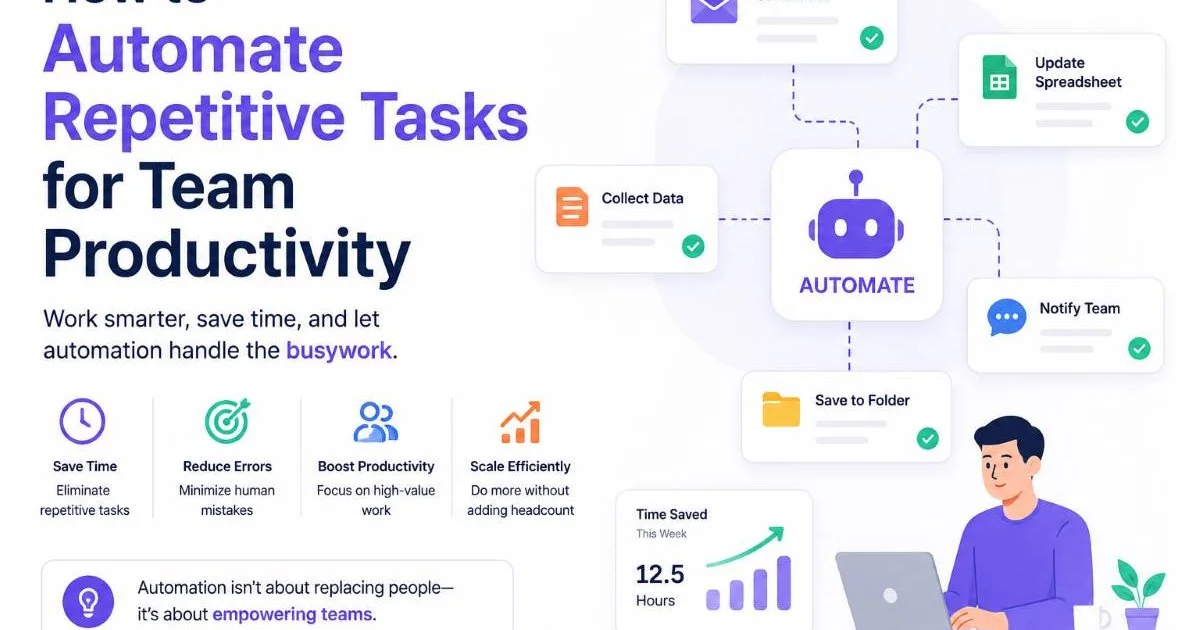
Automated workflows for teams represent one of the most practical upgrades a manager can make to boost team productivity and reduce operational friction. Yet many team leads hesitate, unsure where to start or worried that workflow automation requires deep technical skills. The reality is far simpler. With the right approach, you can build your first automated workflow in an afternoon and see measurable results within a week.
This tutorial walks you through every step, from identifying the right process to automate all the way through testing and iteration. If you're new to the concept, understanding what workflow automation is, with real-world examples and how it works, will give you a solid foundation before diving in. The goal here is practical: by the end, you'll have a working automation that saves your team real time.
Key Takeaways
- Start by automating one repetitive, rule-based process your team already performs manually.
- Map every step of the workflow before touching any automation tool.
- Choose a tool that matches your team's technical comfort level and budget.
- Test your automated workflow with real data before rolling it out team-wide.
- Review and refine your workflow monthly to keep it aligned with actual needs.
Step 1: Identify and Map the Right Process
Choosing Your First Candidate
The biggest mistake team leads make is trying to automate something complex right out of the gate. Your first automated workflow should target a process that is repetitive, rule-based, and performed frequently. Think about tasks like sending weekly status update reminders, routing new support tickets to the right team member, or copying data between a form submission and a spreadsheet. These are ideal candidates because they follow predictable patterns with minimal exceptions.
Read also How Prompt Clarity Improves AI Response Quality
Spend a few days observing your team's daily routines. Ask each member to note which tasks feel tedious or mechanical. You're looking for activities that don't require human judgment at every step. A useful filter: if you could write the instructions on an index card and anyone could follow them, it's a strong automation candidate. Understanding the key differences between task management and workflow automation helps you distinguish which problems need a tool and which need a process change.
Ask your team, "What task do you wish you never had to do again?" The answers reveal your best automation targets.
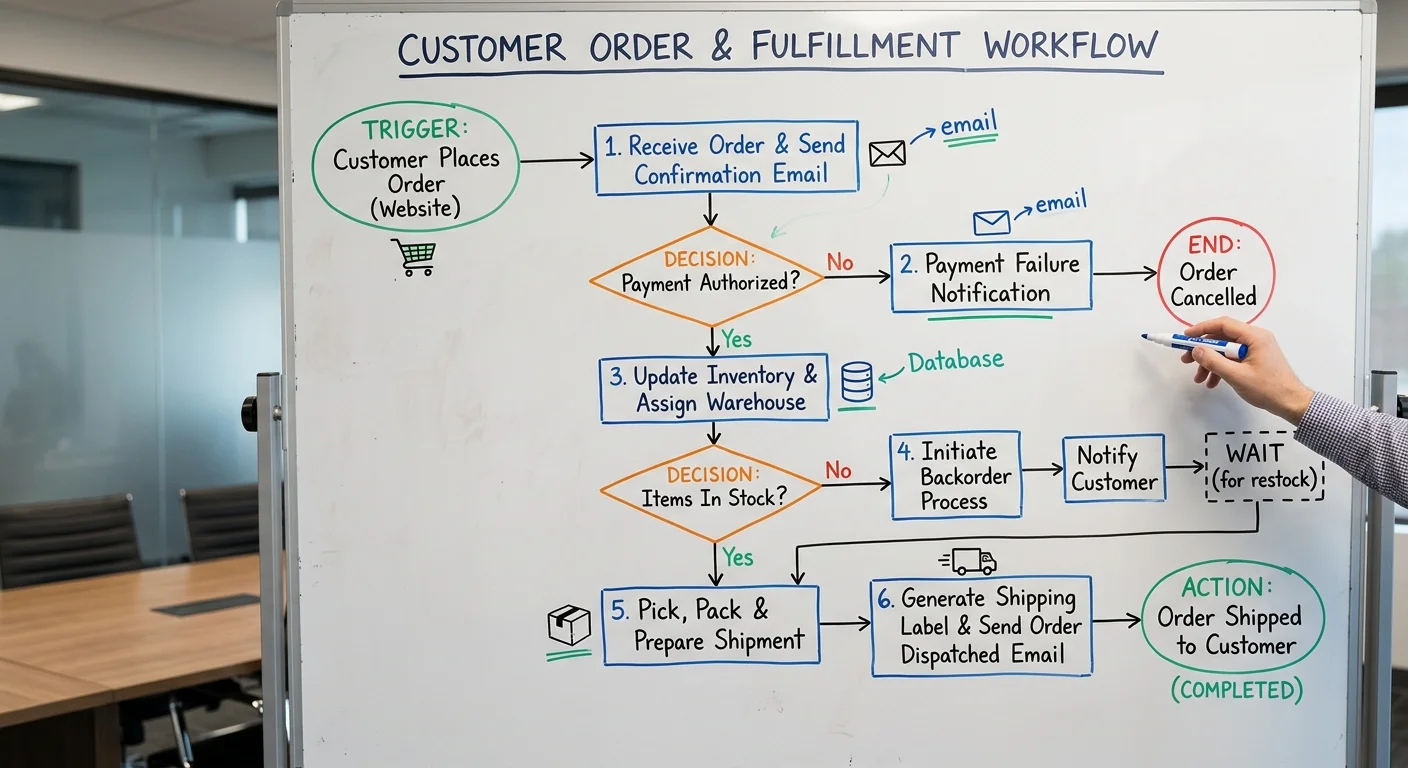
Mapping the Workflow Visually
Once you've picked your process, map every single step on paper or a digital whiteboard. Include who does what, what triggers the process, what decisions get made along the way, and what the final output looks like. Don't skip steps that seem obvious. Automation tools need explicit instructions, and gaps in your map will become bugs in your workflow. A typical map includes a trigger event, two to five action steps, at least one decision point, and a clear endpoint.
At the end of this step, you should have a clear visual diagram that any team member could review and confirm as accurate. If someone on your team says, "Actually, we also check with finance before that step," add it. This map becomes your blueprint. Resist the urge to improve the process at this stage; just document what actually happens today. You'll optimize later.
Step 2: Select Your Automation Tool
Matching Tools to Team Needs
The tool you choose matters, but not as much as you might think. Most modern automation platforms handle common triggers, conditions, and actions well. What really differentiates them is ease of use, pricing at your team's scale, and how well they integrate with software you already use. For teams just getting started, platforms with visual drag-and-drop builders lower the barrier significantly. If you're evaluating options, a comparison of top workflow automation tools for small teams can narrow your shortlist quickly.
Evaluating Integration Capabilities
Before committing to a platform, verify it connects with every application in your workflow map. If your process involves Slack notifications, Google Sheets data entry, and Jira ticket creation, your tool needs native integrations (or API access) for all three. Missing even one integration means you'll need workarounds, which defeat the purpose of automation. Check the tool's integration directory and confirm it supports the specific triggers and actions you need, not just general app connectivity.
Also consider your team's technical capacity. If your developers are comfortable with APIs, tools like n8n offer tremendous flexibility. For teams where the manager builds the workflow personally, a no-code platform is the practical choice. Following DevOps best practices around version control and documentation is smart here, especially if you plan to scale your automations later. At the end of this step, you should have your tool selected, an account created, and your key integrations verified as available.
Don't pick a tool based solely on a feature list. Sign up for a free trial and build a test workflow before committing your team's budget.
Step 3: Build and Configure Your Workflow
Setting Up Triggers and Actions
Open your automation tool and start building. The first element is always the trigger: the event that kicks off the workflow. This could be a new form submission, a calendar event, a message in a specific Slack channel, or a new row added to a spreadsheet. Configure the trigger to match your workflow map precisely. Most platforms let you test the trigger immediately by pulling in sample data, which confirms the connection is working before you build further.
Next, add your action steps in sequence. Each action corresponds to a step in your map. For example, if your workflow routes support tickets, the first action might create a task in your project management tool, the second might assign it based on category, and the third might send a notification to the assignee. Name each step clearly. "Create Jira ticket" is far more useful than "Step 2" when you're troubleshooting six months from now. Keep your naming conventions consistent across all workflows you build.
Use your tool's built-in test feature after adding each action, not just at the end. This isolates errors quickly.
Adding Conditions and Branches
Most real workflows have decision points. "If the ticket is urgent, notify the on-call lead; otherwise, add it to the weekly queue." In your automation tool, these are represented as conditions or filters. Set up each branch to mirror the decision points in your workflow map. Be explicit about what qualifies for each path. Vague conditions like "if it seems important" don't translate to automation; you need specific criteria such as a priority field equaling "High" or a dollar amount exceeding a threshold.
After configuring conditions, review the entire workflow from trigger to endpoints. Every branch should terminate in a defined action, even if that action is simply logging the event. Orphaned branches, where the workflow just stops without completing an action, create confusion and data gaps. At the end of this step, you should have a fully configured workflow that mirrors your original map, with sample data flowing through every path successfully.
"The best automated workflow is one your team doesn't have to think about; it just runs, reliably, every time."
Step 4: Test, Launch, and Optimize for Team Productivity
Running Your First Test
Testing is where most teams cut corners, and it costs them. Run your workflow with real data (not just sample data) at least five times before launching it to the full team. Vary your inputs to cover edge cases: what happens when a required field is empty, when the trigger fires twice in rapid succession, or when an assigned team member is out of office? Each test should produce the exact output you'd expect from a human performing the same process. Document any failures and fix them immediately.
Invite one or two team members to participate in testing. Fresh eyes catch assumptions you've baked into the workflow without realizing it. Have them trigger the process naturally and observe the results. This also builds team collaboration and buy-in, because people trust systems they've helped validate. The way automated workflows improve team collaboration often starts right here, during the testing phase, when teammates see manual busywork disappearing in real time.
Keep a testing log. Record the date, input data, expected result, actual result, and any fix applied. This becomes invaluable for troubleshooting.
Monitoring and Iterating
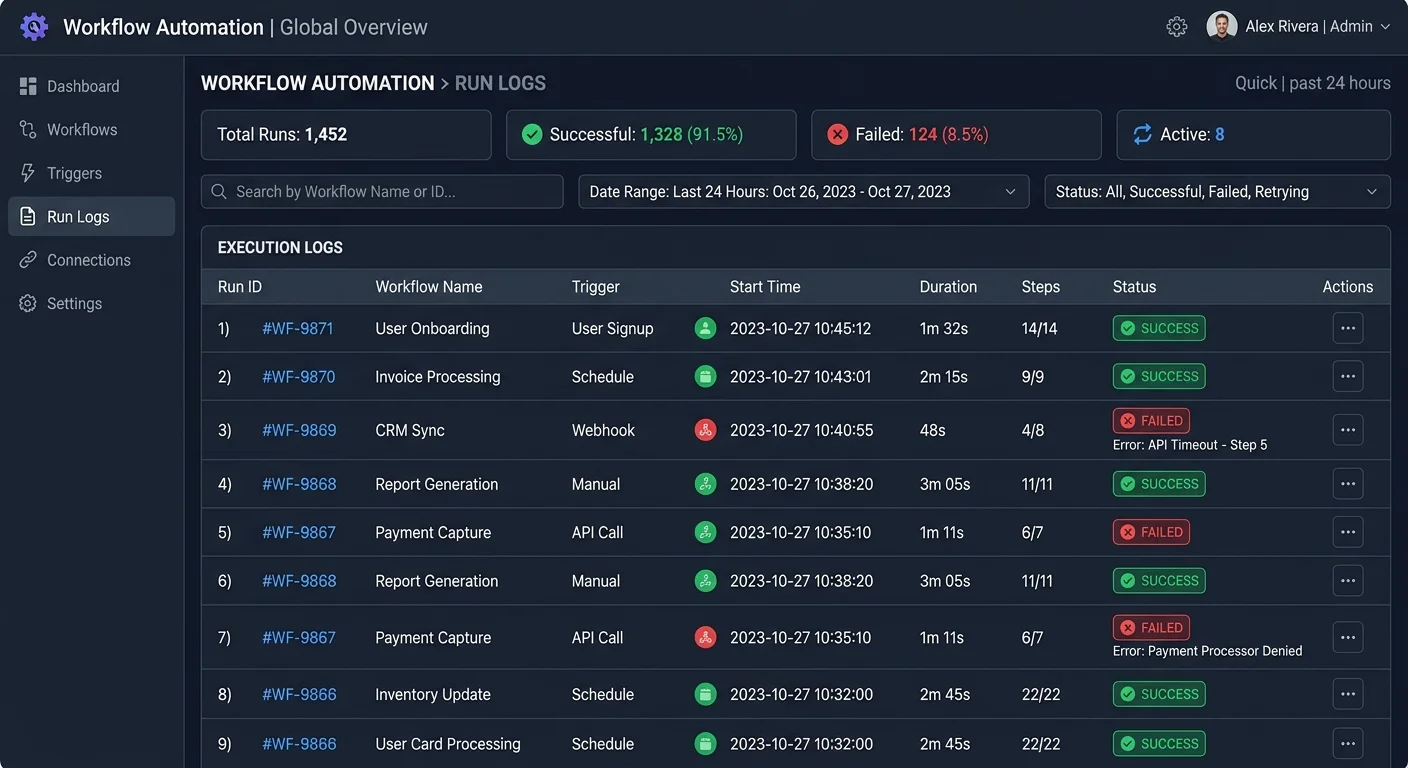
After launch, monitor the workflow closely for the first two weeks. Most automation tools provide run logs that show each execution, whether it succeeded or failed, and where failures occurred. Check these logs daily during the initial period. Set up error notifications so you're alerted immediately when something breaks. Common post-launch issues include API rate limits, changed field names in connected apps, and permission errors that only appear under certain conditions.
Schedule a monthly review of every active workflow. Look at run counts, failure rates, and time saved. If a workflow runs successfully 95% of the time but fails on a specific edge case, decide whether it's worth building a fix or handling that case manually. Automation doesn't need to be perfect to be valuable; it needs to be reliable enough that your team trusts it. Over time, you'll find opportunities to extend your workflows, adding new steps, connecting additional tools, or triggering secondary workflows from the output of the first.
Frequently Asked Questions
?How do I map a workflow visually before building it?
?How long does it actually take to build a first automated workflow?
?Is workflow automation different from just using a task management tool?
?What's the most common mistake teams make when starting workflow automation?
Final Thoughts
Building your first automated workflow is less about technical skill and more about clear thinking. When you map the process honestly, choose the right tool for your team, and test thoroughly, the results speak for themselves.
Start small, prove the value, and use that momentum to automate the next process on your list. Within a few months, your team will wonder how they ever operated without these systems running quietly in the background, freeing up everyone to focus on work that actually requires human creativity and judgment.
Disclaimer: Portions of this content may have been generated using AI tools to enhance clarity and brevity. While reviewed by a human, independent verification is encouraged.